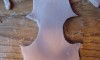
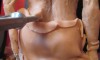
Not a lot going on with this lesson but I thought I would give a look at the back from one more angle. The left side of the back is as far as I’m going to take it until I move forward with the right half of my back. I wouldn’t recommend sculpting a back this way because it can mess up the balance of the muscles in the piece. The best approach is the sculpt the entire form at once. The only reason why I broke it down into the shapes is because I wanted to show a contrast between the two halves. Read the rest of this entry »
Search Results
Tribal Back – 4
On October - 6 - 2009
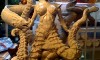
The top half of my back still needs some work but I want to move on to the lower back to try and pull all the shapes together. I’m going to need to start working on the right half of the back pretty soon to make sure that all the shapes are coming together correctly. Once I sculpt the right half I should get a good idea if any of the individual shapes need to be reworked.
For this step I’m sculpting the muscles and skin folds that make up the lower back. Again using a loop too I carve out the areas individual muscles. If I carve away too much I can always go back and add little bits of clay here and there but since the lower back already has too much clay I can carve away the shapes for the folds of skin (and muscles). Read the rest of this entry »
Tribal Back – 3
On October - 5 - 2009
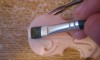
Step three in this tutorial builds on the first two steps that we used to sculpt the back. I continue to build out the individual forms by adding and removing clay to mimic the shapes in my resource material.
For this sculpture I am sculpting the details on the left side of the back first and then will move to the right side. I’m only doing it this way because it is a little easier to create a tutorial using this method. If I was just sculpting this without trying to document the process I would sculpt both side of the back at the same time. Read the rest of this entry »
Tribal Back – 2
On October - 1 - 2009
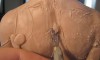
In the last tutorial I briefly went over how I like to draw out a rough outline of the different muscles. I use this trick on quite a few places on the body and it really helps be understand and build out the individual shapes. For example, I like to draw out the individual muscles when I sculpt muscular arms and very lean abs. The back also has a lot going on so even though my outline is pretty rough it still helps me break down the back into the individual muscles (or shapes).
The first step is to separate my back into two halves. Now you can’t just simply carve a line down the center of the back, otherwise your sculpture will look like it has a canon going down the center of it. To make the back look more natural I will blend the two halves of the large back muscles (latissimus dorsi) into the area of where the spine is located. This task is easily accomplished by carving the center edges of the back until it gently slopes to the spine. I keep working both halves of the back until I get a look that I am happy with. Read the rest of this entry »
Tribal Back – 1
On September - 30 - 2009
Sculpting a back can be a little tricky and I’ve always found it to be a bit challenging as well. There are a lot of different muscles and bones that make up the back and more importantly the shapes they create come and go into all different directions. Now sculpting a back with more body fat on it would decrease the difficulty but I prefer designs of a leaner physique. However, the key with this sculpture is to not go too lean on the back because it will not flow well with the rest of the design.
I have already sculpted a rough shape of the back when I blocked out the torso. Now I need to tie the individual muscles together while trying to make it look natural. Using a sharp sculpting tool I like to draw out some of the individual shapes. Basically I’m trying to break out the scapula, traps and lower lats into different basic shapes. Once this stage has been completed I will build out the individual forms. Read the rest of this entry »
Adding Back the Scars
On September - 24 - 2009
I know I just recently put together a lesson on sculpting the scars but the pictures for that lesson were taken a couple of years ago so I thought I would reinforce that lesson and also show you another way to create the individual scars. The previous lesson for sculpting scars was Lesson 8 in this series and for those that missed it you can read it at the following link – Tribal scars
There is an old saying in the US that there is more than one way to skin a cat. For those of you that read this blog from another country the saying simply implies that there is more than one way that you can do things. The saying hold true for sculpting and one way is not necessarily better than another. It really just comes down to your personal preference. I’ve outlined the steps for this lesson below. Read the rest of this entry »
Sculpting Tribal Scars
On September - 4 - 2009
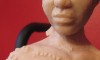
There are several different ways that I could approach sculpting the scars on my sculpture and no one way is really better than the other. Since I’m working with polymer clay, Super Sculpey to be specific, the easiest approach in my opinion is to roll out snakes of clay and remove the unwanted pieces. If I was working with wax I may take a different approach such as adding small balls of wax one at a time but I would have to experiment first before confirming.
* Note: I’ve blocked out parts of the sculpture in case anyone is sensitive to nudity. Once I’m finished I’ll add a link to an uncensored picture of the sculpture for anyone that wants to see the complete design. This will be done at the end of the tutorial and for now I’ll just censor the pics as needed. Read the rest of this entry »
Tribal Hair
On September - 3 - 2009
If you have followed any of my other projects then you have most likely noticed that I like to jump around a lot when I sculpt. For me this keeps things fresh and also keeps me from hyper focusing on just one area (the Fiddler sculpting series is a great example this).
In the last lesson I covered how I sculpted the skirt for my African woman, in this lesson I will go into how I created the details for the hair. The hair is actually pretty simple for this piece but once done has a really nice effect. Since I’m adding a scarf around her head I only need to focus sculpting the hair for a small portion of the head, the rest will be covered by the scarf. Read the rest of this entry »
Tribal Skirt
On September - 1 - 2009
OK, first off my apologies. It has been a little over two years since I’ve updated this project so I’m having to go through old pictures to piece it back together. This is still an unfinished sculpture so I will try to schedule time to work on it in-between my current projects. The good news is that it shows the durability of polymer clay. You can set it aside for a couple of years and in most cases pick up from where you left off.
As I commented in a previous post, I initially started out planning only to create a bust for this figure. I ended up changing my mind along the way and decided to do a full figure instead. In order to make this work a makeshift armature was needed to build out the lower half of the sculpture.
Ideally the best case scenario is to build out the armature for the entire figure from the beginning but we do not live in a world of best case scenarios. My designs are usually dynamic in that they change throughout the sculpting process. This tutorial is a good example on how I like to try and figure out how to “make something work” even after the original plans have changed.
Sculpting Tribal Arm
On July - 13 - 2007
I think the pictures in this tutorial explain everything pretty well so just follow the images from left to right. Since my arms will be dangling at the side this method works pretty well.
If you plan to pose the arm or add additional weight to it by placing something in the hand then you would want to build an armature that supports the arm better then what I have shown below.
* This sculpture is created with Super Sculpey.